Monday, July 29, 2013

Geometry, Pizza, and One of My Favorite People: This is Really Weird but Good

Today, we have a super special surprise guest and I'M REALLY EXCITED because....

IT'S KARISSA RADAKER!

We made something really interesting and new-age. They're called 'pizza cones' and they're probably the greatest thing I've ever eaten. I'm not even kidding. The ingredients are totally based on what you like on your pizza, but the basic things you need are:

    • 1 tube pre-made pizza dough
    • 1 can pizza sauce
    • 1 package cheese
    • 1 roll aluminum foil (not to be eaten)
After that, it's pretty much up to you. We used pepperoni, bell peppers, and tomatoes, but you could also use sausage, mushrooms, garlic, anchovies, pineapples, or whatever other weird junk you like on pizza.

Follow the baking directions on the box to preheat your oven. I think our box said 400 degrees.

The first step for making pizza cones is to make the aluminum foil cones.

This part of the recipe also doubles as a cute hat.

I would tell you the best way to roll foil into cone shapes but I honestly don't know. This was the most difficult part of the whole adventure. I think if you pull off a fairly large rectangular piece of foil and then kind of roll it diagonally and then squish it together in a cone shape it should work but that didn't really make any sense so you're pretty much on your own. 

Once you've (somehow) shaped the cones, it's time to get out the dough! Simply open the tube and pull out the dough on a flat surface. It may help if you use the best cooking utensil ever known to man, the rolling pin! to flatten out the dough a bit. 

When the dough is nice and flat, cut it into squares that are the same length as your foil cones. Sprinkle a bit of flour down and then slooowly and caaaarefully, wrap the dough around the cones and firmly press the ends together. Don't press the dough on too tight because at some point you will have to remove the foil center. Unless you like aluminum foil pizza, which I do not recommend.

Sorry for the quality of these pictures. Nick took his camera
on vacation so I had to use my iPhone. Sorry. Sorry.

I don't know why but this reminds me of The Smurfs.

Dress up your pizza cones with a nice black blazer and some sensible-yet-classy heels. I mean, dress up your pizza cones by brushing on some melted butter and sprinkling on some oregano, basil, or your favorite spices.

These beauties are ready for a night on the town.

Put your pizza cones in the oven for 8-10 minutes or however long your package instructions say.

Let your cones cool to the touch. The dough should be puffed up and golden brown.

Semi-Italian.

Now you have to remove the foil from the cones. The simplest way to do this is to separate the dough at the top from the foil at first and then gently tug the foil out. I'm not going to lie, it is pretty frustrating. Halfway through you may get discouraged and want to give up, but don't! I believe in you. I believe in your strength and your ability to overcome aluminum foil.

See, I promise it's possible. You can do it.

At this point, you pretty much have total control over what to do now. You can put sauce in them if you like it, but if you don't then don't. If you like cheese, sprinkle in a bunch of cheese, if not don't. It's up to you! However, I will give you a photo montage of what we did.

Cheese is one of the greatest things in my entire life.

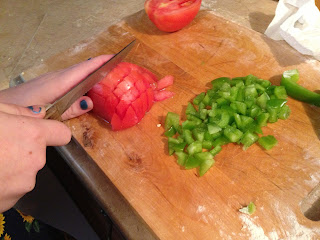
Quick way to dice veggies: cut across the whole thing
in strips going one way, then rotate 90 degrees and do the 
same thing.

Paint me like one of your French sauces.

Cornucopias of love.

Once you're satisfied with the contents of your now full pizza cone, place a paper towel over the plate and pop them in the microwave for 3 minutes or until your cheese is gooey, melty and the pizza cones smell delicious.

Which one is the lady and which one is the tramp?

Congratulations! Your pizza cones are finished and (hopefully) delicious!

Never eat a Hot Pocket again.


Also let's talk about something totally unrelated to baking for a second. The wonderful David Zorn (I made him a cheesecake once, remember?) is coming out with a new film very soon and the trailer was just released yesterday! I helped with production a lot and also wrote about 90% of the story and dialogue. So if you like my writing on the blog, you will probably love this movie! Heh heh heh. Heh.
Heh.

But seriously it is incredibly well done. Here is a link to the trailer: 

Please pleeease watch it, like it, and share it with all your friends!! Thank you!

Monday, July 22, 2013

Scone Rhymes with Gnome Sort Of: Let's Pretend to Be British For a Bit

This entire thing might be kind of incoherent because I am incoherent at the moment and also at most moments.

But let's make scones!!! Scones are these really awesome sugary biscuit things that people in England like to eat (maybe..?). You can do a lot of different things with them by adding different fruits/flavorings, but the ones I made are just plain or have a sprinkling of cinnamon on top.

Pip pip cherry-o.

This dough gets pretty sticky and messy, but it's so much fun!

You will need:

    • 2 cups flour
    • 1/4 cup sugar
    • 1/4 teaspoon salt
    • 2 1/2 teaspoons baking powder
    • 1/2 teaspoon baking soda
    • 1/4 tsp all spice
    • 6 Tablespoons butter
    • 3/4 cup buttermilk
    • 1 egg
    • a little melted butter for topping
If you decide to use fruit, you'll want to cut up about 3/4 of a cup and mix it in eventually. I'll tell you when. Don't worry.

Preheat yo oven to 400 degreeeeees.

Next, as with most baking expeditions we go on, you're going to mix together all of the dry ingredients first. This means the flour, sugar, salt, baking powder, baking soda, and all spice. Got all that?
I wonder how many pictures of bowls I've taken
in the past month. Probably 12,000.

Remember when we made that pie and you had to use a fork to mix in the butter? Remember when we made lemon bars and you had to use a fork to mix in the butter? Remember when baking was essentially just similar ingredients and techniques slightly modified each time to create a different outcome?

Use your fork to mix in all the butter until it's all crumbly and yummy-like.

Mmm, lumpy.

AT THIS POINT, if you are mixing in fruit, go ahead and toss those babies in and stir them around.

In a separate mixing pourer thingy (see picture, I don't know what they're called), beat together the egg and buttermilk. I couldn't find regular buttermilk at the store, so I had to mix this weird evaporated buttermilk stuff with water and milk, but it turned out fine. Just know you may have to do that.

This thing. Legitimately what is it called?
For as much as I bake, I have absolutely no idea.
A measuring cup? Maybe.

Once you've realized just how truly delectable whisked buttermilk and egg is, pour it in and mix it with the dry ingredients. This is the part of the recipe where you get to have extra fun and use your hands like a barbarian. Yay!

Most of the joy I get from baking is actually just
from making a mess.

Get out 2 cookie sheets and grease them with vegetable shortening or whatever your heart desires. Pull out a scoop of the dough that is roughly the size you want (more dough - more scone, less dough - less scone) and coat it in flour.
I'm sorry but this is just so much fun to me.

Place each scoop on the pan until you run out of dough. I think I ended up making about 12 scones, but you can adjust that based on the size of them. If you want I bet you could just make one super scone, but you'd probably have to bake it a while.

To Americanize this English dish, melt some butter and brush each scone evenly with it. Then place your cute little English nuggets into the oven for 20 minutes. They should puff up nicely.

A spot of tea would go quite right with these.

Congratulations! You made scones. If you made plain ones like I did, they are really good for breakfast if you spread on a little bit of jelly. I'm so proud of you!

Also this is sort of related, but I made one of those ask.fm thingys today and it's pretty cool. I got a bunch of baking questions earlier today that you can check out if you want, or ask more baking/whatever questions:

http://ask.fm/aehtila


Love you all <3333

Monday, July 15, 2013

I Baklava You: My Cousin and I Bake Greek Pastries

This is my lovely cousin Helen.

Today, my cousin Helen is guest starring to help me make something super weird and exotic because she is super weird and exotic. Her instructions/comments will be in this font and mine will be normal.

Baklava is basically like pastry lasagna and all you really have to do is chop some nuts and layer some dough. Don't forget to preheat your oven to 350 degrees. Celsius! Just kidding.

For this recipe you will need:
    • 1 package phyllo dough (found in the frozen dessert section of grocery stores)
    • 1 package nut of your choice
    • 1 teaspoon cinnamon
    • A LOT OF BUTTER
For the glaze you will need:
    • 1 cup water
    • 1 cup brown sugar
    • 1 teaspoon vanilla 
    • 1/2 cup honey


I chopped the nuts because I'm super weird and exotic.

The very first thing you're going to do is finely chop your nuts. Hahahahahahahahahahahahahahahahahahah..

Okay I'm not a thirteen year old boy. Finely chop whatever nuts you are using for this recipe, as shown above. We used walnuts and they were great. Place the nuts in a large bowl and toss with the teaspoon of cinnamon. This step also doubles as Cosmo Sex Tip #24.

Now comes the weird part, as if this already wasn't weird enough. We are going to use phyllo dough, which is essentially paper that is rolled up in a box. So be veeeeerrrryyy careful unrolling it, because you don't want it to rip.

It could also be used as a veil for your wedding. 
Give your husband a reason to marry you.

After greasing a regular sized cake pan, place one sheet of the dough in the pan and then smother it with butter like a lonely mother smothers her child with love and cookies. Continue to do this until you have eight layers done or your son runs away from home.

Look at Helen butter that dough. I'm so proud of her.

I just want to warn you now that this may give you diabetes.

Can you get diabetes from butter?

I don't know, ask Paula Deen. Wait...

Note: Paula Deen is in no way associated with Edible Happyness, me, or my blog.

Anyway, after you've layered and buttered eight sheets, sprinkle 2-3 Tablespoons of the nut mixture on top.

If you look closely, you can see the Grim.

Once you've sprinkled on the nuts, lay down two more sheets and butter the top, then add another sprinkle of nuts. Continue to do this until you run out of nuts or butter or energy. It's pretty rigorous. Once you're out of one of those things, however, you're going to layer another sheet of phyllo dough and butter it, layer another sheet of phyllo dough and butter it, layer another sheet of phyllo dough and butter it, layer another sheet of phyllo dough and butter it, do you understand yet? Do this eight times.

I still don't get it!

Too bad. Now we will cut the baklava into pretty shapes. Which I don't get. I'm spatially challenged.

Cut the baklava into four vertical strips. That means cut three times. In case you don't understand. Then cut diagonally in one direction, and then diagonally in the other direction. It's not that hard. You can do this, comrade.

It's like the dessert of the future. In the present.

Now this beautiful piece of work is going to be put in the oven for fifty minutes. The dough puffs up and turns golden brown and crispy.

Our next step is to make the honey glaze! 

On medium heat, combine water and sugar. Stir them occasionally until sugar is dissolved. Don't do this:

I may have underestimated the distance 
between the fridge and the measuring cup.

When the water and sugar have combined, stir in the vanilla and honey. Once it is all mixed up, turn on low heat and let it simmer for about twenty minutes.

 I don't actually have a cousin, I just grew a third arm.

Take the baklava out of the oven. It should be nice and toasty.

I was actually really surprised that this even worked.

You can now spoon on as much of the honey glaze as you want. But it's really good so I recommend using all of it.

I am taken abaklava by how delicious this is.

I will leave you all with that statement. Congratulations on making another delicious treat.


Saturday, July 13, 2013

A Lemon and an Egg Walk Into a Bar: I Write Apathetically About Lemon Bars

I don't know why but I am in an incredibly uninteresting mood and this post is as boring as a post. Wait. 

Anyway, I'm sorry if it's not clever but at the very least it's functional.

This plate contains approximately 100 calories per bar.

As I've said before, I'm trying to eat healthier. As I've also said before, it's a little difficult eating healthy and also blogging about delicious treats. But! Fear not. Because I've found this wonderful recipe for super healthy lemon bars. In just one bar, there's only 100 calories, 17g carbohydrates, and 3g fat. ISN'T THAT AMAZING???? 

At the very least, it's not bad for sort of healthy snack. Plus it doesn't take very long to make.

For the crust:

    • 3/4 cup flour
    • 3 Tablespoons sugar
    • 1/2 stick butter
For the lemon batter:

    • 1 egg
    • 1 egg white
    • 2/3 cup sugar
    • 2 Tablespoons flour
    • 1/4 teaspoon lemon zest
    • 2 Tablespoons lemon juice
    • 1 Tablespoon water
    • 1/4 teaspoon baking powder
    • powdered sugar to taste
First, preheat the oven to 350 degrees.

Alright, so possibly the most important thing you will ever do in your life is properly coat the pan you're going to bake these lemon bars in. If you don't, the rest of your life could be miserable and disappointing. Or you'll just have a tough time getting them out of the pan. I use butter, but you can also use cooking spray or vegetable shortening.

You're going to mix together the flour and sugar first, and then cut up the butter into cubes. The best way to do this is as follows:

Cut into strips.

Cut strips in half on the top, and then on the side.

Enjoy your butter cubes.

Remember when we made a pie together? And you used your fork to mix in the butter until it was all crumbly?

Well I hope you do remember, because we're about to do that again! Slowly mash the butter in with the sugar and flour.

It's like we're making a pie.
But we're not really making a pie.

Pour this concoction into the pan, and press it around evenly with your fingers. I don't have anything clever to say here just do it.

A lot of the things I bake end up looking like sand.

Place the pan into the oven for ten minutes and then set aside. 

And noooow we move on to the lemon batter! This is the fun part that smells like you're cleaning the shower.

In a the same bowl, whisk together 1 egg and 1 egg white. Remember when you separated the egg white and yolk for the pie? Just do the same thing. Maybe this post is so boring because there aren't really any new skills to learn for it. Whisk the eggs together until they are bubbly and frothy.

  We could also make egg drop soup.

Once your eggs are mixed up, mix in the sugar, flour, water, and baking powder. Now, this is where it gets interesting. Maybe. Probably not. I don't know.

You're gonna zest a lemon! Isn't zest a fun word? This is a fun post because I'm using the word zest. Zest zest zest! Be entertained! 

If you don't have a lemon zester, you can use a cheese grater and it is basically the same thing. To zest a lemon, hold the zester over a plate/bowl and put pressure on the lemon as you move it back and forth. It takes a bit of effort to get enough lemon zest for the bars (you need about 1/4 of a teaspoon), but I promise it's worth it!

Every Villain Is Lemons


Once you've zested the lemon enough, you're still not done! Squeeze enough juice out of the lemon to fill up 2 Tablespoons. The most effective way to do this is to squeeze the lemon until it can't be squeezed anymore, and then pop it in the microwave for about ten seconds, and squeeze it even more.

Mix in the lemony goodness, and then whisk to your hearts content or until the batter is nice and thick.

This is what it should look like.
Even my photo captions aren't funny. I don't know what's
wrong with me.

Pour the mixture evenly into the pan and bake for 15 minutes or until the batter is thick and lemon bar-ey. Once it is finished, let it cool in the refrigerator for about an hour and then sprinkle on as much powdered sugar as you like.

Let the deliciousness of these lemon bars distract you
from the boringness of this post.

You made lemon bars!! I'm so proud. I promise I'll be more interesting next time. I love you all.

Wednesday, July 10, 2013

PR'in:If You're Looking for Recipes, This Isn't the Post

This is full of nothing but shameless self promotion and various opportunities to follow this blog even more. Some of these sites are really cool and definitely worth checking out!

I've added Edible Happyness to a site called 'Bloglovin' which is just a collection of blogs from various different hosting sites like Word Press, Blogspot, Tumblr, etc. If you set up an account (you can link it to Facebook in like two seconds), then you can follow this and other blogs, AND get notifications when the blogs have new posts.

Also, I've set up a Pinterest for Edible Happyness and have a bunch of links back to this blog, as well as a bunch of other junk that I thought was interesting. It's basically my old Pinterest updated to say 'Edible Happyness,' so chances are if you're already on Pinterest, you're connected to it. But if not, please take a look!

Monday, July 8, 2013

3.14159265359: Where I Make Some Horrible Math Jokes and Then a Pie and Then Some Horrible LOTR Jokes

Today we will calculate the circumference and volume of this can.


Time for one of my favorite things to bake!

Today we're gonna multiply your happiness by adding a delicious treat to the equation

Oh goodness I can't do this

Okay today we are going to make a pie and it's going to be awesome.

Sometimes people say "It's easy as pie!"
Those people are unoriginal and should not be making pie, no matter how easy it is. I'm going to assume you aren't one of those people that joke about pie, but I guess even if you are, I'll teach you how to make one anyway.

First, pre-heat the oven to 350 degrees. You will need:

    • 2 cups of flour
    • 1 teaspoon salt
    • 2/3 cup vegetable shortening
    • Roughly 1 cup of ice water
    • pie filling of your choice
    • 1 egg white
    • 3 Tablespoons milk
You'll also need wax paper, a pie pan, and my favorite baking utensil ever - the rolling pin.

Measure out the vegetable shortening and stick it in the freezer. While it's cooling, get out a big glass bowl, then measure out the flour and salt. Whisk them together with a fork. Once you've done this, get the vegetable shortening from the freezer. It should feel nice and cool, about like the other side of the pillow when you flip it over at night. Except I wouldn't want a pillow made of vegetable shortening. Ew.

Using your fork, scoop out the vegetable shortening and mix it in with the flour/salt mixture until it breaks up into smaller pieces.

 Yeah, you could probably stick this in a pillow. Maybe.
I don't know.

Get the ice water and slowly pour in a bit at a time until the mixture starts coming together. You don't HAAAAVE to, but my favorite part about pie baking is using my hands to mix the dough in with the water, and I also think it is the most effective method for good pie crust. But you better wash your hands first because you weren't raised in a barn, ya filthy animal. (If you were actually raised in a barn, I am incredibly sorry and meant no offense, however you should still wash your hands).

Coming Soon to a theater near you:
Attack of the Killer Pie Hand

Once you have a nice, soft ball formed in your bowl, clean your hands off and quit making shadow puppets in the middle of the day that doesn't even make any sense.

You're going to now find some clear counter space. Spread out a layer of wax paper and sprinkle a bit of flour over it. Place half of your dough on this and then cover it with another sheet of wax paper.

r/battlestations

And now....... WE GET TO USE A ROLLING PIN!!

Rolling pins are super fun and cool and awesome because not only can you use them as a baking utensil, you could probably use it as a weapon if you ever got robbed while trying to cook. So it has like twice the opportunities.

Also coming soon to a theater near you:
The Lord of the Blogs: Return of the Rolling Pin

A day may come, when the strength of ovens fail, when we forsake our cookies and break all bonds of fellowship, but today is not that..

Sorry. I got sidetracked. 

What're we doing again?

Oh yeah, pie. Okay, so once you've set up your area, use the rolling pin to flatten Sauron's hordes of orcs until...okay seriously I'm sorry I'm focused now, you're going to use the rolling pin to flatten the pie dough until it is about half an inch thick, then make your way through the Black Gate to continue battling.

If I knew how to embed the instrumental track set to Aragorn's speech
at the Black Gate, I would do so here.

Once you've done so, place your pie pan upside down on the pie dough, flip the pie dough/wax paper/pan over, then peel off the wax paper. Press the dough in evenly around the edges, and make sure to let out any air pockets or halflings that may have gotten stuck. 

Filling time! For this pie, I am just using a store bought filling, but homemade filling is delicious as well and I guarantee I will be making posts about different homemade fillings in the future. I'm using cherries today but you can use whatever your heart desires. As long as it's not the One Ring. 

I bet Rosie Cotton of Hobbiton makes delicious pies.

Now, at this point you have two options. You can either flatten out the second half of the pie crust like you did before, seal it on top, and stick the pie in the oven. But I think it looks way cooler if you make a lattice crust, and I'm going to teach you how! With pictures! For Frodo!

Start by flattening the pie dough as before, and then cutting it into thin, vertical strips.

 Try to make them the same width cause otherwise your pie
looks dumb. Not that I'd know.

Evenly space a few of the strips going one direction. I placed mine vertically, so I will teach you how to make lattice crust vertically, but obviously for horizontal you just rotate everything 90 degrees. This is going to be a little difficult to explain through text, but I also have pictures which should help. I'm doing my best. In my picture I already have one strip laid down, but just pretend I don't, it works the same. 

For the first horizontal strip you lay down, leave pieces A and B down but lift C and D.


Place the horizontal strip horizontally (imagine that), and then pull pieces C and D down over it.


Next, pull up A and B while leaving C and D down. Place a strip so it lays over C and D.


Repeat these steps until your pie is fully covered in beautifully woven strips.

Next, you're going to give your pie a bath. In eggs. Mmmm.

In a small bowl, mix together 3 Tablespoons milk with the egg white of an egg. If you don't know how to separate an egg, it's a little messy, but basically just crack it and let the white part run into the bowl while keeping the yellow yolk in the shell/your hand. Also, always be sure to wash your hands after touching raw eggs. I wouldn't want you getting salmonella because of this pie.

Whisk the egg white and milk together just a bit, and then use a cooking brush or a spoon to lightly cover your pie in the gooeyness.

It looks like the scissors are hiding behind the pie, getting
ready to attack me.

The egg wash gives the pie a nice golden brown, crispy tint that makes it look oh so delicious. Place the pie in the oven at 350 degrees for 45 minutes.

 Don't let it cool on the windowsill or the neighbor
boy may try to steal it.

You did it! You made a pie. Now go give it to your math teacher, a group of hungry hobbits, or my brother.

Thank you for reading!